Following on from the ‘Minecraft Servers – What are they?’ post, this article aims to help you understand the basics of Minecraft servers and how you can use them. This information is for the PC/Mac version of Minecraft only. I understand there are a few family-friendly servers for the Pocket Edition and Xbox versions of Minecraft, the vast majority of servers work with the PC/Mac version, which is what we’ve been using.
Server Basics You Need to Know
Before you join a public server, there are some basic things you and your child need to know:
- Spawn Points: Just as in ‘normal’ Minecraft, when you join a server game your player will usually spawn (start) at a set point in the world, this is often referred to simply as ‘spawn’. The spawn point may be in some kind of lobby area, with lots of signs telling you about the world and rules for playing (if appropriate) or it may be in the centre of a main playing area, such as a city. You can usually type the command /spawn to return to your spawn point within the game. On some servers you will spawn in an area the first time of use only, so that you can read information about using the world, they will then allow you to set your own spawn point for future visits, or might set one for you that means you don’t have to read the rules every time you play.
- Speaking of ‘Rules’: Nearly all servers will have some rules to follow as to what you can and cannot do. The family-friendly servers tend to have a big list of strict rules, which will include things like bad language and virtual bullying and/or ‘griefing’ (see below). Make sure you read all the rules thoroughly, especially if you’ve got younger Minecrafters – they might find this bit a little dull and need your help picking up the key bits relevant to them. (When you first join some servers – like Cubeville – they make you to walk past lots of signs with the rules on and then you have to read FAQs at the end, before you can go into the world). If you don’t follow the rules, you can be banned temporarily or even permanently from the server. Having a little pad to hand, where you can jot down specific commands for that server can also be handy and save you having to open up FAQs in the text chat box all the time!
- Griefing: A potential issue on public servers is griefing. Griefing is a term used to cover activities like demolishing other players’ buildings or stealing their stuff (anything from harvesting their crops to stealing from their chests). A lot of the servers we’ve come across — but not all — use special plug-ins to stop griefing. Typically these plug-ins will let you lock your chests, doors and furnaces, as well as protecting buildings or outside spaces for any patch of land you claim as your own, which stops anyone else from breaking blocks or building within your claimed area. For added protection, griefing is usually forbidden in the server rules and so anyone caught griefing will be warned and then banned. The ‘Admins’ and teams who run the servers can also often assist with returning missing items or reverting a building back to the condition is was in before griefing occurred. Phew! 🙂
- What is the difference between a server and a world? A server is usually a single public location which hosts several ‘worlds’ that you can move between, simply by logging in to the one server. For example, if you go into the Hypixel server, you go into a main central area, where you’ll see lots of other Minecrafters running around, and you can select which specific mini-game world you wish to visit from there. To move between this main central area and the other worlds you go to specific points, that are clearly labelled and teleport from there into the game you’ve chosen.
- Text Chat: Minecraft has built-in text chat (the ‘T’ key), which is the default way that your kid will communicate with other players. Chat can be public or private (one-to-one). To use this function your child will need reasonable reading and typing skills – chat can move quite quickly, with mods and other players offering tips to you via this message panel. It’s not essential for them to be able to use it fully, but it will help them get the most out of the game. If you’re around, you can always help them out, or one of the things we’ve done it use the ‘typing practice’ programs to help speed up HopperBoy’s typing, which will make it easier for him to communicate during online play. Bad language? Most of the family-friendly servers employ automatic filtering to prevent swearing in text chat. As with all online chat, make sure you remind your kid never to give out personal details when chatting, although they are in a game, they are still strangers.
- Voice Chat: Some servers can link up with voice chat servers such as Mumble, TeamSpeak or Ventrilo which enable players to speak with one other while playing. We’ve not ventured down this route at all – I’d be happier for him to improve his typing skills! If you do want to use this option with your child, you will need to look at what safe guards you can put in place to be careful about who they’re talking to, and what they’re talking about…
- Using Server Commands: Server commands are a big part of server gaming and will help you get the most out of online playing. To use them you’ll need to give various commands to the server as you play, usually by pressing the / (slash) key, followed by the command name and, sometimes, some extra text – e.g. /home teleports you to your home point (as you’ve set in the game). The commands vary from server to server, but you pick them up quickly – the notepad mentioned above can be useful for this! – also, there’s usually a command, such as /help that brings up a list of all the usable commands for that server if you get stuck.
- Using mods: We’ve got a few mods loaded up for Minecraft, but a lot of the servers don’t allow the use of mods inside their worlds – perhaps for cheating, but also because of compatibility issues. In general, we’ve just logged in to the server using the ‘vanilla’ profile and avoided any issues.
So, I think that’s it for the basic ‘things to know’ – let’s get onto a server!
Joining a Public Minecraft Server
Joining a public Minecraft server is actually quite easy – certainly easier than loading mods can be!!
- Open the Minecraft game launcher and click ‘Play’ to run the main Minecraft game.
- When you reach the main title screen, click ‘Multiplayer’.
- In this new screen you will see any servers you have previously loaded up to link to. If it’s your first time, then it will obviously be empty, but you can click ‘Add Server’ button to add the server.
- On the new screen you can type in a Name for your server, to easily identify it. You should then type in the server location (IP) such as ‘mc.hypixel.net’
- Click ‘Done’, to go back to the main page.
- You should now have a server that you can highlight and then click ‘Join Server’ to take you straight through to the game world.
Troubleshooting Public Minecraft Servers
Compatibility – The first and most obvious issue might be that the profile that you’re trying to join the server with is too high or too low for their version. i.e. if the main Minecraft game is now running on 1.9, but the server is set up for 1.8.3 and you go in on that profile, it won’t allow you on.
This can be easily resolved (in a similar way to how you create the right profiles to use various versions of mods), by creating a new user profile from the Minecraft launcher to add to your drop-down list on the main page:

On this screen, click ‘New Profile’ button in bottom left-hand corner.
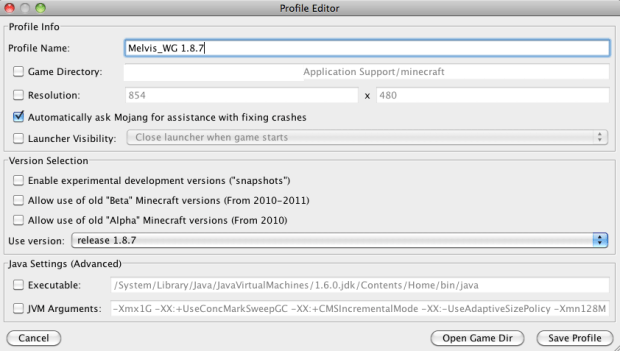
On the next screen, it will normally say ‘Always Use Latest Version’ in the ‘Use version’ drop-down box. This is where you should click and select the correct, compatible release version of Minecraft to match with the server you want to join. To help me remember which is which, I update the profile name to include the release number after my name. Click ‘Save Profile’ when you’ve done this.
If you now log back in to the Multiplayer Game – as per instructions above – the server game should be ready and waiting for you to join! 🙂

Whitelisting – This is where a server is protected by a ‘whitelist’ – essentially a list of usernames that are permitted to join the server. If your name is not on that list, then you will not be allowed to join.
In order to join a whitelisted server you need to apply to have your Minecraft username added to their list (usually via a form on their website). Sometimes it will clear in a few hours, others take a few days. You will need to make a separate application for each Minecraft username that you wish to add. Once you’re on the whitelist, you should be able to join the server via the same process outlined above.
Whitelisted servers do offer an extra element of reassurance that the users are known to the server administrators.
That’s it for now! Hopefully with the above instructions you’ve got everything you need to join multiplayer Minecraft worlds on public servers. As this is quite new for HopperBoy and me, we’ll be trying out some of the servers we’ve found in the next few weeks and drop some reviews on here to let you know what we think.
